TAKE STOCK – WEEK 7
If you’re like me, you may have not quite completed some of the tasks in the previous six weeks of Take Stock. So, let’s declare this a Catch-Up Week. If you missed, or didn’t quite finish the tasks for a week, this is the time to do that.
Still need to procure some items for your Medicine Cabinet? Review THIS post.
Did you finish re-stocking and organizing your Baking Pantry? Review THIS post.
Still have gaps in your supply of Condiments? Review THIS post.
Do you have enough Containers in which to keep your food supplies? Review THIS post.
What Paper and Plastic Products are keeping on hand? Review THIS post.
How does your Spice Cabinet look? Review THIS post.
Take a breath and Take Stock of what you’ve accomplished the past few weeks!
JUST KIDDING!
We are in the time of year I refer to as the “teasing season.” From February through April, Mother Nature insists on tormenting us with the “look-it’s-beautiful!-never-mind” roller coaster.
Take, for example, this weekend. Yes, there was 70-degree weather, sunshine, daffodils and bullfrogs on Friday with all the cheer they brought. However, because fairy tales are not real, yesterday it was in the “you can almost go without a coat, but you’ll be sorry if you do” temps. By early evening the temps dropped back into the 30’s and stayed there through today (Sunday), the wind picked up, and there’s been an icy cold rain all day requiring winter coats, gloves, and scarves. (West of me, in the mountains, they got walloped with snow – reminding me that rain is not so bad).
Despite the weather, we managed to get enough done for me to be satisfied with our efforts. I can tell it’s been a productive weekend when the garbage bin that gets collected on Friday is full again by Sunday.
Besides the standard laundry / grocery shopping (I hadn’t been in four weeks) / vacuuming type chores, Oscar cleaned his room while I sorted through three years of paperwork and receipts.
I used to be OCD about filing. When I first started Adulting, I tried to follow the “rules” and every vendor, or at least category, had its own file folder to put every receipt generated for the year with a new set of files begun at the beginning of January each year. Over the years, I realized this contributed nothing but stress to my life and I have become quite casual in my handling of papers. So other than the documents in my Important Documents Binder, my current “method” is to throw everything into a box and at the end of each January (yeah right, lol), keep the important stuff and throw away the unimportant stuff. Any statements, bills, or receipts I am keeping for that year go into an expanding wallet folder, on which I write the year put in a box with other years’ folders. I do have a few categories that I sort out and keep separate – like big purchases for the house, medical information, etc.
I am pleased to report that project was completed, and my collection box is now empty.
(Yeah, sorry, Jessica and Erica, this is what you get to deal with when I’m gone. Don’t bother asking, “Why did she keep this??” There was always a good reason at the time. Oh, and don’t be fooled if you find something you are looking for – there’s more somewhere else.)
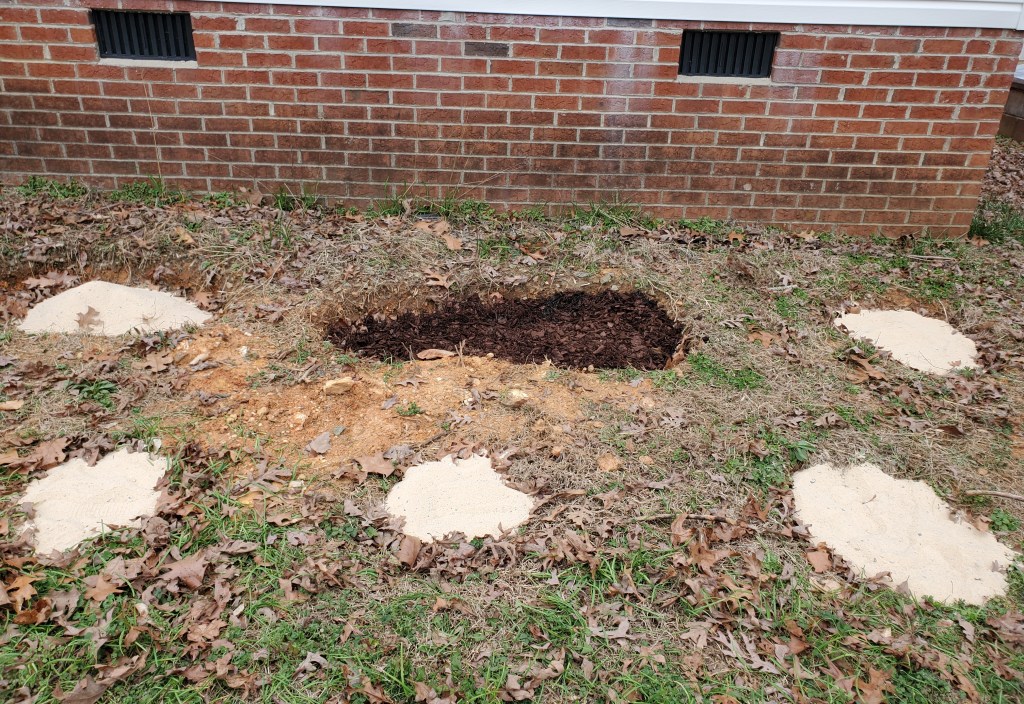
We also put a fresh layer of bedding in the chicken coop, bought concrete blocks for an upcoming project, bought five bags of sand to put in the holes left when the azaleas were removed from in front of my house, and bought a few t-posts we are going to need to fence in the expanded in-ground garden. We even dumped the sand and a leftover bag of mulch in the holes. We’ll have to get more before covering the area with landscape material, but at least I won’t trip in the holes anymore.
I also finally sorted through some canning supplies and inventoried my supply of lids. I believe I have enough for the year. I must say, it hurt my heart a little bit to discover and discard several boxes of canning lids purchased in 2013 and 2014. The manufacturers recommend using the lids within five years and I just don’t want to risk the wasted time and effort that would result from failed lids.
Now, don’t be fooled. Looking at my house you wouldn’t think I accomplished much. Everything I did was one of those “invisible tasks” we are all familiar with. More importantly, these were all projects that were weighing on my mind, and I am grateful to have them done!
And, yes, the garbage bin is full!
DAFFODILS & BULLFROGS
It may still be winter by the calendar but there are signs that Spring is on its way.
Yesterday the temperature here in central North Carolina got into the 70’s. It was very welcome and felt glorious! The sun was even out for a little while.
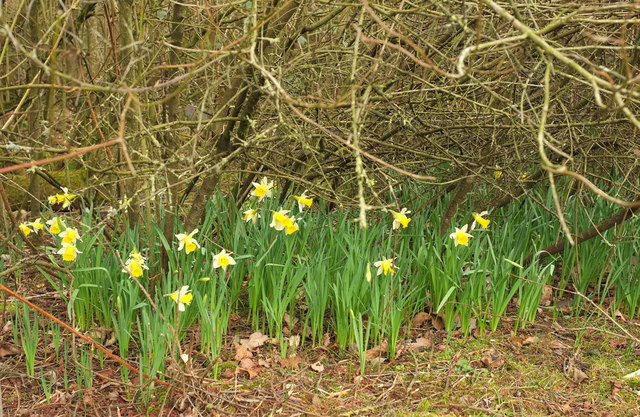
As I was driving home from work, I spied daffodils blooming on the side of the road!
Not only that but I heard bullfrogs croaking wherever there was a little bit of water. That was a little surprising because I usually hear peepers first and bullfrogs later in the Spring.
These small things sure tickled a happy spot in my heart!
TAKE STOCK – WEEK 6
At some point Take Out and pre-made convenience foods becomes unsustainable because of cost and health. As cooking at home increases, so does the need for a supply of herbs and spices.
This week let’s Take Stock of our Spice Cabinet.
Basic seasonings in the Spice Cabinet:
- Salt
- Pepper
- Bay leaves
- Basil
- Cayenne Pepper
- Celery Seed and/or Celery Salt
- Cinnamon
- Chili Powder
- Cloves
- Cream of Tartar
- Crushed Red Pepper
- Cumin
- Garlic Powder
- Garlic Salt
- Minced Garlic
- Giner
- Mustard
- Nutmeg
- Onion Powder
- Minced Onion
- Oregano
- Paprika
- Parsley
- Rosemary
- Sage
- Thyme
There are a few things that make developing a spice cabinet challenging:
Price (many herbs, spices and other seasonings are expensive),
Unfamiliarity (how to use them),
Aging (while most don’t “expire” they do lose potency and effectiveness)
Often, when we are starting to build our Spice Cabinet, we are tempted to purchase a “spice set” to save money. However, while attractive, these sets often provide low-quality/stale herbs and spices and include items that you will not use. Rather than buying a set, buy the spices you need as you make your standard recipes. As you try new things, you will naturally add a bottle of this, a bottle of that.
Another way for some households is to start with spice mixes rather than individual spices. Taco seasoning, Chili seasoning, Herbs de Provence, Monterey Steak Seasoning, Italian Seasoning, Curry Powder, etc. Eventually, we realize even these mixes can be made at home and might move into “ingredient” herbs and spices.
As for the “aging” of your seasonings, while they don’t necessarily go bad, we tend to hang on to them longer than we ought to. Here is a helpful video that covers the storage limits of various herbs and spices:
How to Stock Your Pantry: Herbs & Spices
So, when you Take Stock of your Spice Cabinet this week, determine which ones you want to keep because you use them regularly, be honest about which ones you probably aren’t going to be using and can discard, and determine which ones should be replaced because they are getting too old to be effective.

What’s in your Spice Cabinet?
RAMPING UP
To my Northern friends and family in Omaha, Cheyenne, and Spokane who have been hit hard with winter weather the past few weeks: I’m sorry Phil is such a cranky rodent that he would impose another six weeks of winter on us all!
Despite what that rude groundhog claimed this morning, I have been ramping up for Spring and intend to continue to do so.
As I inventoried my seeds to determine what I want/need to acquire for this year’s garden, I realized I needed to get them better organized. I had my seed packets shoved in a cardboard box. My stash is a mixture of 2021, 2022, and 2023 seeds. Some were freebies, some were purchased in a big box store, some came from seed catalogs and websites. Some of the envelopes have been opened and partially used, some are not opened, some were even empty (apparently, I was keeping the packets to remember what I had used?).
What a jumbled mess!
I had occasionally seen You Tubers with fancy seed boxes, so I thought, “I need a seed box to tame this chaos.”
I found some lovely specimens on Amazon after a fruitless search around the house. Holy Hannah, they were expensive!
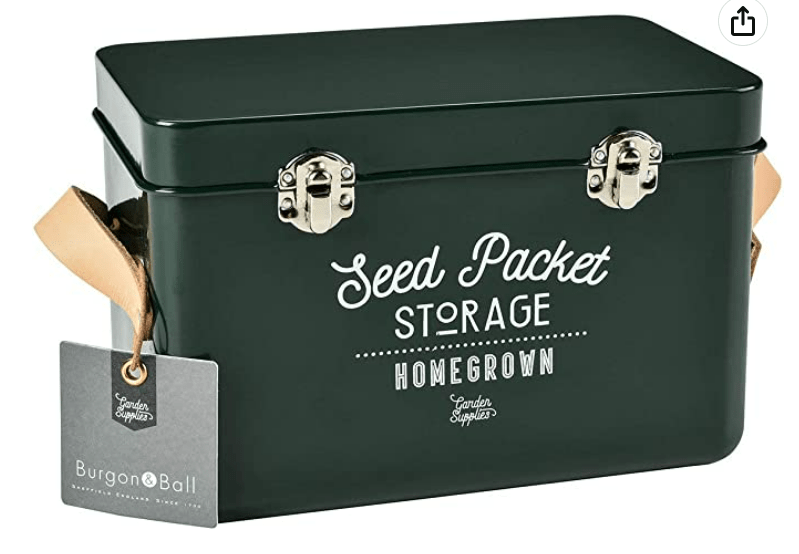
Luckily, I came upon THIS which was the perfect solution for me.
It arrived today and I had a satisfying time tonight getting everything nicely organized.
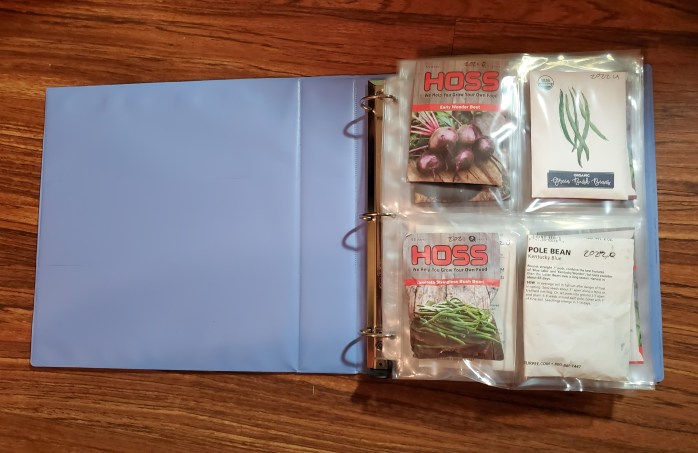
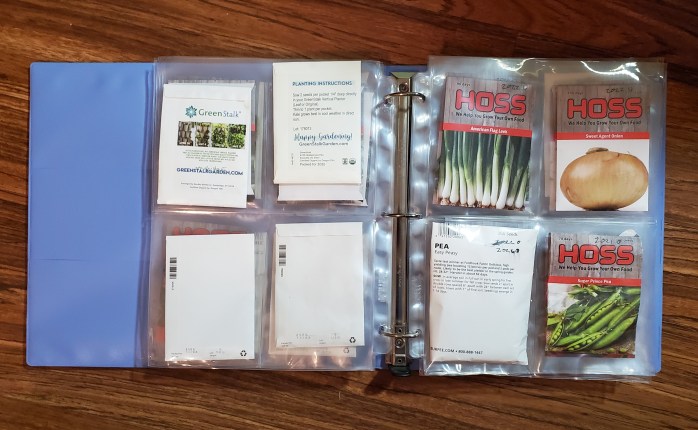

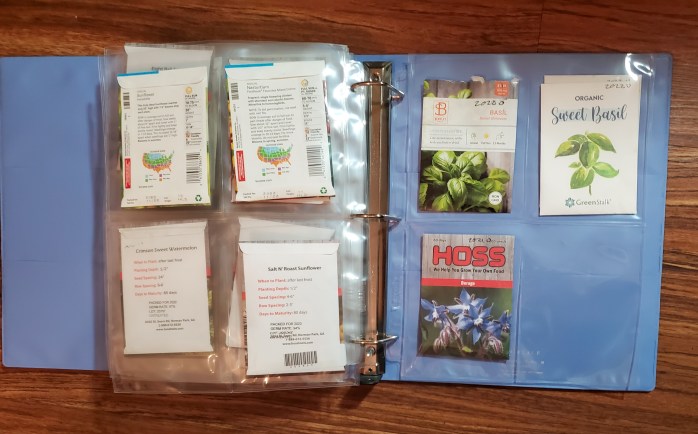
Doesn’t that look great?
Now, where did I put the shipment of seeds that came earlier this week …. ??
TAKE STOCK – WEEK 5
Piggybacking off last week’s review of food storage containers and supplies, this week let’s Take Stock of other paper and plastic products we use.
Do an inventory of:
Paper towels
Napkins
Toilet paper
Kitchen garbage bags
Kleenex
Paper plates
Paper/plastic cups
Plastic cutlery
These are not, strictly speaking, necessities in the home. Some would say they are wasteful. Nevertheless, they sure come in handy, not just for post-disaster emergencies but also for the everyday kind of emergencies we encounter.
The Great Toilet Paper Shortage of 2020 should still be in everyone’s remembrance, but it doesn’t take a worldwide pandemic to create problems. I remember in the 1970’s (when a trucking strike prevented shipments of goods coming from the Lower 48 to grocery stores in Anchorage, Alaska), looking down the empty toilet paper aisle with dismay. While, yes, there are non-disposable alternatives to toilet paper, if our modern-day sensibilities would rather not think about such things, we had better make sure we have enough toilet paper in our storage!
Paper plates and cups along with plastic cutlery are not just for picnics at the park or large informal gatherings. There are other ways these items can make our lives easier. On the disaster end of things, when there is no water at the house, you certainly don’t want to have a bunch of dishes to wash. At the other end of the “emergency” spectrum, when you are ill, just had a baby, or there is some other upheaval going on in your life, sometimes getting meals made is pushing it — looking at a pile of dishes afterward just makes you feel worse. In these events, just use the disposable goods!
So, this week, look at what you have on hand, determine what you would want to have in your supply for extraordinary – and not so extraordinary – circumstances and fill in the gaps.
REAPING THE REWARDS
I always feel a sense of satisfaction and contentment when my efforts pay off. It may seem a little thing but today I felt like eating peach cobbler. So, I made peach cobbler…because I have all the ingredients on hand. I even made it a bit more special by making:
Blueberry Peach Cobbler
- 1 1⁄2 cups flour
- 1 cup sugar
- 3 teaspoons baking powder
- 1⁄2 teaspoon salt
- 1 cup milk
- 1 cup blueberries (fresh or frozen)
- 1 cup canned peach
- Cinnamon
Preheat oven to 350 degrees.
Combine flour, sugar, baking powder and salt in a bowl. Add milk and stir well (I mixed 3 T of milk powder in the dry goods and added a cup of water). Lightly spray casserole dish (I used 11 x 7) and pour batter into dish. Sprinkle a little cinnamon on top of the batter. Place blueberries (that I put in my freezer last summer) and peaches (that I canned) on top of the batter. Bake 1 hour until golden brown and set. Serve hot or cold.
Yes, it was very Yummy!
TAKE STOCK – WEEK 4
Preparing meals, or even just single ingredients, ahead of time is a great way to build your food supply with homemade convenience foods. Once-a-Month or freezer cooking, Make-a-Mix Cooking, making more than one meal’s worth of a dish to store and serve on another day, all fall into this category. This of course means you need to have the supplies and containers to keep that food.
This week let’s Take Stock of our supply of kitchen storage supplies.
As with anything, each household may look a bit different but take time this week to inventory your supply of:
Tupperware-type containers
Plastic baggies (snack, sandwich, quart, and gallon size)
Plastic wrap
Wax paper
Parchment paper
Aluminum foil
Additionally, if you are into canning, now is the time to inventory your supply of jars and lids. If you vacuum-pack foods for the freezer or pantry shelf, make sure you have sufficient bags. Instead of keeping bags of flour, sugar, rice, baking mix, pancake mix, etc. on the shelf, extend their useful life by keeping those in air-tight containers.
Now that you know how much you have, determine how much of each you use in six months or a year and work toward keeping a supply that will be there when you need it.
Another thought – these wraps and many of the containers are one-use/disposable items. Do you want to get away from throwing all that money in the trash and filling up the landfill and waterways with plastic? There are reusable versions of almost all these food storage products!
HOW SWEET IT IS
If you’ll remember, I purchased fifty pounds of sweet potatoes back in November. This was a welcome addition to my food supply.
Sweet potatoes are versatile. They can be prepared in both sweet and savory dishes. They are often used as a substitute for pumpkin and other squashes.
Sweet potatoes are nutritious. They provide an excellent source of beta carotene which the body converts to vitamin A, an essential nutrient. Studies have shown that vitamin A deficiency increases gut inflammation and reduces the ability of the immune system to respond properly to potential threats. Sweet potatoes also contain a good amount vitamin C, potassium, and manganese in each serving and are a decent source of many other vitamins and minerals. Sweet potatoes have a variety of benefits, including improved blood sugar regulation, reduced oxidative damage, anti-cancer properties and improved immune function, gut health, brain function, and eye health.
While properly cured and stored sweet potatoes can last six to eight months, there are other ways to extend their life even further. Canning them is one way to do that and canning means they become part of my convenience food pantry.
Today I canned sweet potatoes
I washed and peeled five pounds of sweet potatoes. My canning guide indicated 11 pounds is needed for 9 pints so, since I was only doing 5 pints, I thought 5 pounds would be about right. See below for the results of that math.*
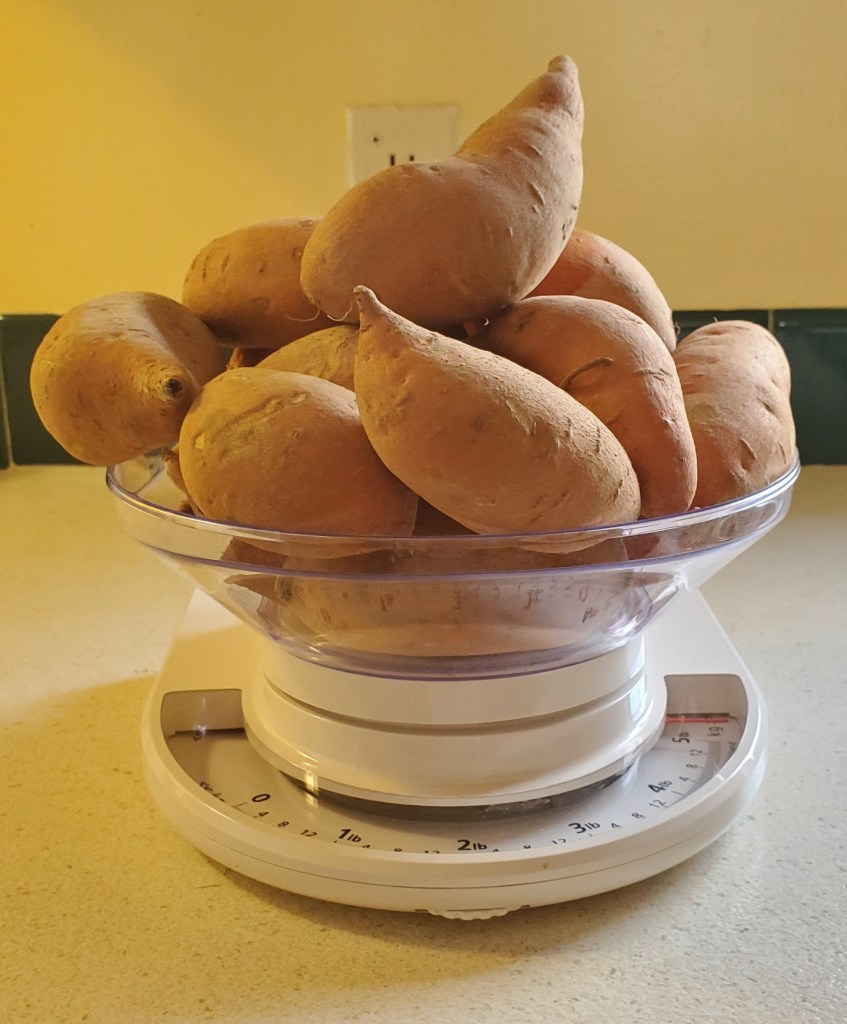
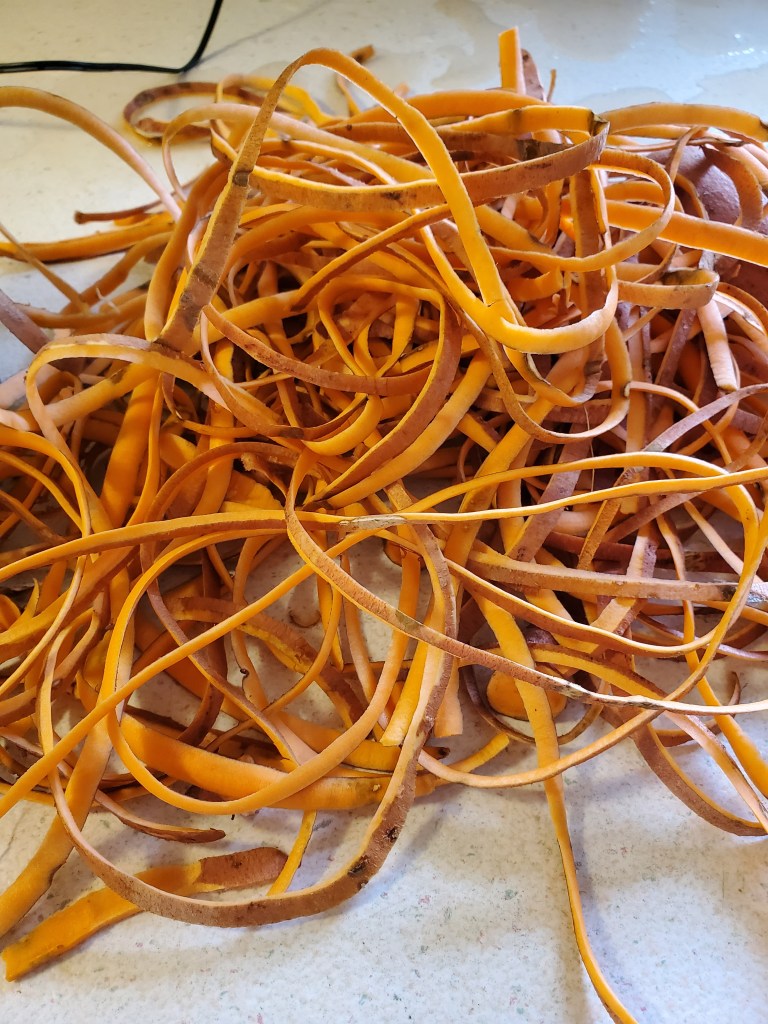
Peeling all those sweet potatoes would have been oh-so-tedious which made me grateful, once again, that I have an electric peeler.
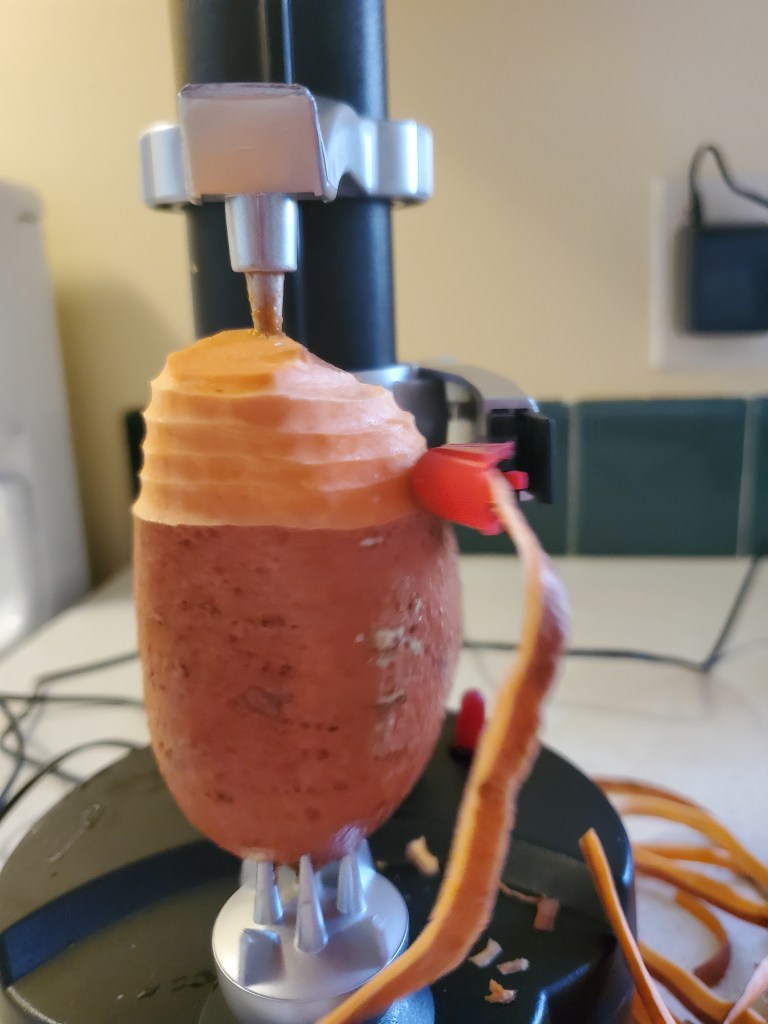
The chickens and worms are going to enjoy these peelings!
The next step was to cut the potatoes into chunks. I then soaked them for a bit. This wasn’t part of the instructions, but I needed a break. When I was ready to go again, I drained and covered them with fresh water and boiled them for 10 minutes. I used a slotted spoon to load them into the jars, covered them with boiling water, put the lids and rings on and put them in my electric canner to pressure can for 65 minutes.
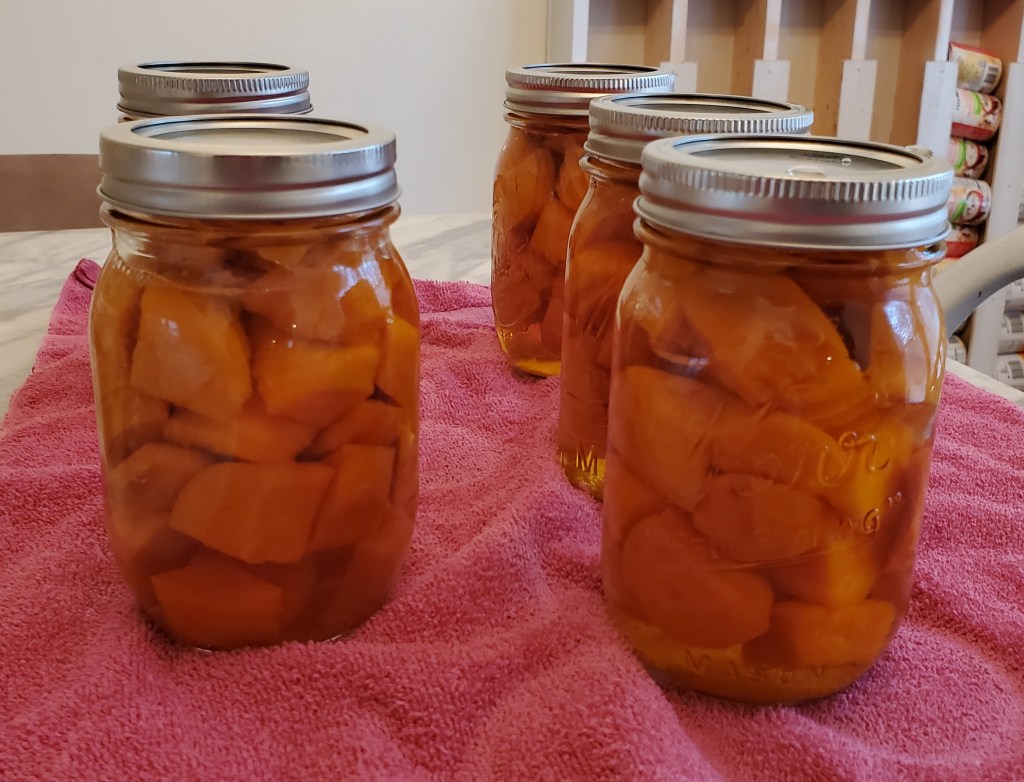
I had never canned sweet potatoes before this. It was more work than canning chicken but not too much so. Certainly not as much work as peaches. I wouldn’t be able to do a load of sweet potatoes when I come home from work, but it was a pretty straightforward process, so worth the time and effort.
*Epilogue
Since I rarely get the math right, I was not surprised to learn that five pounds was too much for five pints. I only needed to prepare four pounds. I had enough left over for another two and a half jars. I didn’t have another load in me though, so I put the rest of the boiled sweet potato cubes in the fridge. I used part of them to try a new recipe tonight and will figure out what to do with the rest in another meal.
Sweet Potato Hash
1 large sweet potato, diced
1 T water, or as needed
Salt to taste
1 T olive oil
1 small onion, diced
1 c diced ham steak
1/4 t cinnamon
1/4 t cayenne pepper
1 T brown sugar or to taste
Microwave diced sweet potato cubes in water and salt 2-3 minutes or until partially softened. (Since mine were already partially softened I was able to skip this step.) Cook and stir onion in hot oil until slightly softened 3-4 minutes. Stir in sweet potato, ham, cinnamon, cayenne, and salt into the onion, cover skillet with lid. Cook stirring occasionally until sweet potatoes are cooked through, about 10 minutes. If mixture begins to stick to the skillet, add a few tablespoons of water. Sprinkle with brown sugar. Cook and stir until brown sugar is dissolved, 1-2 more minutes.
Result: This was tasty and a nice change from my usual use of sweet potatoes. In the future I will make one change to the directions. I will mix the seasoning (cinnamon, cayenne, and salt) into the brown sugar so it will spread evenly. As written, there were hot spots in the dish instead of a nice blend of sweet and spicy.
WHAT A DIFFERENCE A DAY MAKES
Usually by the time the weekend arrives, at least in the winter, I am drooping with exhaustion, especially when the weather is gloomy and cold. This weekend started out no differently – but this time, I got to take Monday as an extra day off! That meant I could get more than the bare minimum of chores done.
Sometimes during the week, I don’t feel like cooking. On those days I often end putting a frozen pizza in the oven for dinner. I recently commented, “I need to can some soup, so I have some better no-effort meal options.” With my extra day off, I put thought into action.
I pulled a bunch of chicken out of the freezer and put it in the crockpot Sunday. Monday, I pulled the meat off the bones, chopped up carrots, celery, and onions, and added seasoning and water to make a massive pot of soup. After putting the jars of soup into my electric canner, I cooked down the bones, skin, etc. for broth.
I ended up canning four quarts of soup and ten pints of broth:

This was the first time I processed quarts in my electric canner. I don’t normally can in quart jars simply because of household size. One thing to be mindful of when using an electric canner is that canning jars from different manufacturers come in various sizes. The volume they hold is correct, but they can have varying height and width. When canning with quarts, I needed to use shorter quart jars. The regular mouth quart jars are too tall as were some wide mouth jars. The electric canner can handle 4 wide mouth quarts, 5 regular mouth pints, 4 wide mouth pints, or 16 – 4 oz jelly jars (in two layers) in a load. The other thing to be aware of with an electric canner is that quart jars cannot be used with the Water Bath function, only for Pressure Canning.
After a full and tiring day, what did we have for dinner? Sigh: frozen pizza.
Oscar also had a bit of a productive day off.
Last Spring, to create a space for the Three Sister’s Garden, I put down a layer of cardboard and topped it with two truckloads of garden soil. I’m expanding the garden area this year and, while a repeat of that method would be preferred, I don’t think the truck will be ready to use in time to do that (it’s currently getting some engine work done).
We removed the tarps we’d placed over the old and new spaces this fall to kill off unwanted plant material and Oscar ran the rototiller over both sections. He will need to do a couple more passes with the tiller another weekend, but he’s definitely made a solid start.


You must be logged in to post a comment.